Hôm nay chia sẽ cho anh em code dưới môi trường localhost mà cần chứng thực ssl để làm đăng nhập facebook hoặc google
Mình đã gôm lại trong 1 file generate_ssl.sh việc tạo chỉ cần 1 cú enter 🙂
Step 1: create file bash ở đây mình đặt tên file mình là generate_ssl.sh sau đó copy nội dung code bên dưới bỏ vào:
#!/usr/bin/env bash

# Set the TLD domain we want to use
BASE_DOMAIN=$1
# Days for the cert to live
DAYS=1095

# A blank passphrase
PASSPHRASE=""

# Generated configuration file
CONFIG_FILE="config.txt"

cat > $CONFIG_FILE <<-EOF
[req]
default_bits = 2048
prompt = no
default_md = sha256
x509_extensions = v3_req
distinguished_name = dn

[dn]
C = VN
ST = 8
L = Ho Chi Minh
O = HCM
OU = HCM
emailAddress = admin@$BASE_DOMAIN
CN = $BASE_DOMAIN

[v3_req]
subjectAltName = @alt_names

[alt_names]
DNS.1 = *.$BASE_DOMAIN
DNS.2 = $BASE_DOMAIN
EOF

# The file name can be anything
FILE_NAME="$BASE_DOMAIN"

# Remove previous keys
echo "Removing existing certs like $FILE_NAME.*"
chmod 770 $FILE_NAME.*
rm $FILE_NAME.*

echo "Generating certs for $BASE_DOMAIN"

# Generate our Private Key, CSR and Certificate
# Use SHA-2 as SHA-1 is unsupported from Jan 1, 2017

openssl req -new -x509 -newkey rsa:2048 -sha256 -nodes -keyout "$FILE_NAME.key" -days $DAYS -out "$FILE_NAME.crt" -passin pass:$PASSPHRASE -config "$CONFIG_FILE"

# OPTIONAL - write an info to see the details of the generated crt
openssl x509 -noout -fingerprint -text < "$FILE_NAME.crt" > "$FILE_NAME.info"

# Protect the key
chmod 400 "$FILE_NAME.key"

sudo security add-trusted-cert -d -r trustRoot -k /Library/Keychains/System.keychain ${PWD}/"$FILE_NAME.crt"
Step 2: Save file ở folder nào đó của mình. Ví dụ mình đăng lưu ở thư mục desktop thư mục ssl
- – Bước này mở terminal lên => cd đến folder đang chưa file generate_ssl.sh
- – Tiếp theo chạy lệnh: sh generate_ssl.sh {{domain}}
Ví dụ: mình đang demo tạo 1 ssl:
- – step 1: cd /Users/nguyentinh/Desktop/ssl
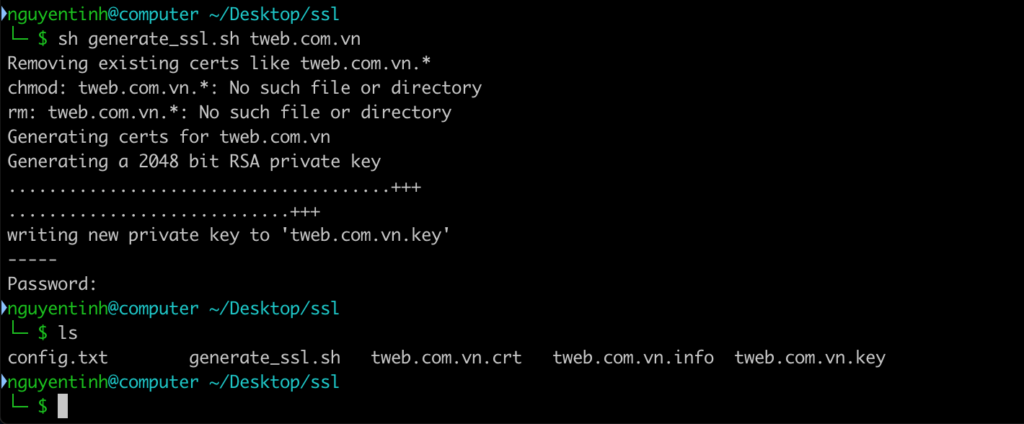
- – step 2: sh generate_ssl.sh tweb.com.vn
- – step 3: ở bước này sẽ hỏi Password (ở đây là pass đăng nhập của máy tính mình). Bên dưới là hình mình họa.
- – Sau khi tạo xong sẽ có các file: tweb.com.vn.crt, tweb.com.vn.info, tweb.com.vn.key

Dưới đây là phần tích hợp ssl vào nginx (do mình đang dùng nginx) 🙂
server {
    listen 80;
    server_name tweb.com.vn;
    return 301 https://$host$request_uri;
}

server {
    listen 443;
    server_name tweb.com.vn;
    root /var/www/html/public;

    ssl on;
    ssl_certificate /usr/local/etc/nginx/ssl/core.org.crt;
    ssl_certificate_key /usr/local/etc/nginx/ssl/core.org.key;

    access_log /usr/local/etc/nginx/log/core.access.log;
    error_log /usr/local/etc/nginx/log/core.error.log;

    location / {
        index index.php index.html;
        try_files $uri $uri/ /index.php?$query_string;
    }

    location ~ \.php {
        fastcgi_param SCRIPT_FILENAME $document_root$fastcgi_script_name;
        include fastcgi_params;
        fastcgi_pass 127.0.0.1:9000;
        fastcgi_split_path_info ^(.+\.php)(/.+)$;
        fastcgi_buffers 16 16k;
        fastcgi_buffer_size 32k;
    }
}
Anh em thử xem kết quả thế nào. Nếu có cách tạo nào hay cũng chia sẽ bên dưới nhé.